How to Migrate Your Website to SeekaHost WordPress Hosting Using UpdraftPlus

By James Flarakos | April 25, 2024
Guide on migrating your website to SeekaHost’s WordPress hosting, whether you are moving from another hosting provider or from our multiple IP hosting. We’ll use a popular plugin called UpdraftPlus to ensure a smooth transition.
Step 1: Prepare Your Site for Migration
First, log in to the WordPress dashboard of the website you wish to migrate. Here’s how you can prepare your site:
- Install UpdraftPlus: Navigate to ‘Plugins’ > ‘Add New’. Search for ‘UpdraftPlus’, install, and activate it.
- Take a Full Backup: Go to ‘Settings’ > ‘UpdraftPlus Backups’. Click on ‘Backup Now’. Ensure all files and database options are selected for backup. This may take some time depending on the size of your site.
Step 2: Download the Backup Files To Your PC
Once the backup is complete, download the following files to your computer, which UpdraftPlus will have created:
- Database
- Plugins
- Themes
- Uploads
- Others
Click on each component in the UpdraftPlus panel and select ‘Download to your computer’.
Step 3: Set Up a New WordPress Installation on SeekaHost
- Log into SeekaHost: Go to the WordPress Sites section and create a new site. If you haven’t chosen a package yet, select one that fits the number of sites you want to migrate.
- Enter Domain Name: Input your domain name (without ‘www.’) and other necessary details.
- Install UpdraftPlus During Setup: Opt to include UpdraftPlus in your installation for easy restoration later.
Step 4: Update Your DNS Settings
- Adjust Name Servers: Once your new site is ready, update the DNS settings by pointing your domain to the new SeekaHost servers. This involves copying the provided name servers and updating them where your domain is registered. The nameservers you need will be provided one you create your new WordPress installation.
Side Note If Moving PBN Blog to WordPress
If you are moving your site from our PBN hosting to our WordPress hosting, at this point you will need to take a few extra steps.
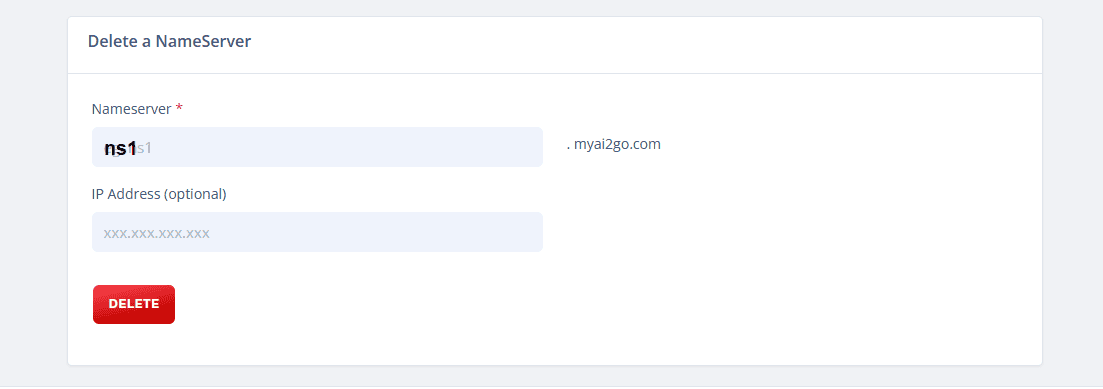
- Delete your exiting nameservers by going to your domain list > click on the action cog > unlock the domain > go to nameservers > Scroll to the bottom and first delete ns1, then ns2.
- You will need to delete your blog from the PBN blog list. This is because SeekaHost cant have the same 2 sites hosted on the same servers. So you will need your blog deleted first before starting your new WordPress site with the same domain name.
Step 5: Restore Your Site on SeekaHost
- Log into Your New WordPress Site: Navigate to ‘Settings’ > ‘UpdraftPlus Backups’.
- Upload Backup Files: Use the ‘Upload backup files’ link in UpdraftPlus to upload the files you downloaded earlier.
- Restore Your Site: After uploading, select all components and click ‘Restore’. Follow the prompts to ensure all parts of your site are restored correctly.
Step 6: Final Checks and Configuration
- Check Your Site: Once restoration is complete, verify that all elements (pages, posts, plugins) are intact and functioning as expected.
- Re-enable SSL: Secure your site by enabling SSL through your SeekaHost panel to ensure all data transmissions are encrypted.
Conclusion
Migrating your site might seem daunting, but with the right tools and steps, it can be straightforward. By using UpdraftPlus and following these detailed instructions, you can efficiently move your site to SeekaHost’s WordPress hosting, whether from another provider or our own Multiple IP hosting. This ensures a seamless transition with minimal downtime, allowing you to enjoy the robust features and performance enhancements of our hosting services.